There are 3 reasons the Statim 2000 Autoclave will give the Cycle Fault 3 Error:
- There is a problem with the solenoid valve or
- There is a problem with the cassette or
- There is a problem with the Thermocouple
Statim 2000 Autoclave Cycle Fault 3 -Steam Leaking Around Cassette
If there is steam leaking from around the cassette prior to getting the cycle fault 3, then the solenoid is most likely not the problem.
In this article, we will be addressing when the error code is accompanied with steam leaking around the cassette
4 Tips Why The Statim 2000 Is Leaking Steam around the Cassette
The easiest way to narrow down the problem quickly, is to try using a cassette you know is good. If the problem still exists, then you can skip down to the thermocouple. If the problem goes away, then you know it is something to do with the cassette
If, when operating the Statim 2000 Autoclave you see steam escaping from around the cassette, there are 4 possible causes
- The Cassette Seal is worn out and needs to be replaced
- The Cassette hinge is malformed
- The Cassette has worn out
- The Thermocouple has been bent or broken
Statim 2000 Cassette Seal
According to Scican, the manufacturer of the Statim 2000 Autoclave, the Cassette Seal should be replaced after every 800 cycles.
Do not be quick to dismiss the seal as the possible source of the problem because of its appearance. They can look brand new and still be faulty. Over time with the repeated heat up and cool down extremes, the seal will shrink.
The shrinkage is not enough that you can see it, but using a micrometer, the shrinkage can be measured
If you have installed a new cassette seal and steam is still leaking around the cassette, remove it and reinstall it. Be sure to use the liquid soap on the seal when installing it (and at least monthly thereafter). Make sure both little nubs are protruding in each corner (uncovered)
Also make sure the holes in the seal and the rear of the cassette line up
Sometimes, the cassette seal needs to be removed and reinstalled 2 or 3 times before you get it right
Caveat Emptor: It is also possible you are using a defective seal
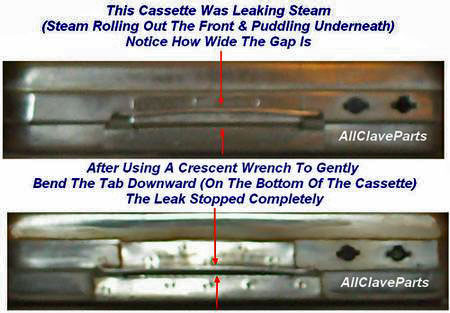
The Statim 2000 Cassette Hinge is Malformed
When you insert the tab from the top of the cassette into the opening on the bottom cassette, they form a hinge.
When looking at the hinge, the two parts should be close together as shown in the picture below. If the bottom tab (which is the top part of the formed hinge) is arched upwards, you can try realigning it by following the directions you will find by clicking here.
The Statim 2000 Cassette Has Worn Out
The Statim 2000 Cassette is well made, but over time they will eventually wear out (over years) and will need to be replaced.
Statim 2000 Thermocouple

The end of the thermocouple protrudes inside the rear left corner (as you are facing the autoclave). With a flashlight, look inside the cassette bay. You should see a pin (the end of the thermocouple, and it should be in the center of the opening and point slightly up as shown in the picture below.

If the pin is bent or broken off, the thermocouple will have to be replaced
Most of the time, the pin being broken or bent is a result of inserting the cassette upside down (instead of the pin lining up with the hole that allows it to be inserted into the cassette, it meets with metal and bends or breaks)
Any of these Statim 2000 Autoclave repairs are something you should be able to do with the Free Technical Support and Guaranteed High Quality Replacement Parts available from AllClaveParts.com