Replacing The Door Insulation Pad Could Not Be Easier With These Simple Instructions
Note: While these instructions are specific for replacing the Delta XL8 Insulation Pad, they are exactly the same for the Delta 8, the Delta Q8, the Validator 8, and the Validator Plus 8. The Pelton Crane Part Number for these models are identical: OEM Part #1539514 (the earliest models had a part number of #0211812)
You can click here to find the replacement Door Insulation Pad for your model autoclave
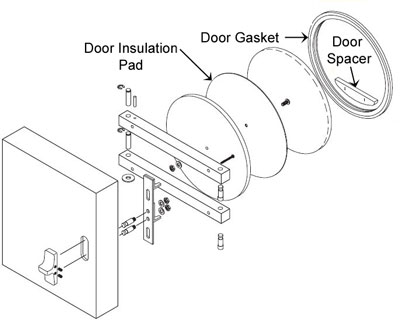
The Delta XL8 Autoclave has an Insulation Pad tucked away inside it’s door assembly
As its name implies, its function is to help insulate the door. It is a round disk made of a ceramic paper
After years of use, one of two things generally happen:
- It gets thinner (or breaks down) and loses some of its insulating capabilities
- It sometimes manages to fold in on itself (wrinkles are literally folds
While we do not currently fully understand how, when either of the 2 above conditions above exist, the door can begin to leak during a cycle. The leak is usually water and not steam. So, if you have replaced the door gasket and spacer, and it is still leaking around the door (dripping water from the bottom)…the insulation pad is the most likely cause
Replacing the Insulation Pad is pretty simple and straight forward. The only tools you will need are a couple of wrenches and a screwdriver to complete the procedure
To find the replacement Door Insulation Pad for the Delta XL8 Autoclave, Click Here
Follow these simple instructions to replace the pad
How To Remove The Old Insulation Pad From The Delta XL8 Autoclave
The first thing you will need to do is to remove the old pad. To do this:
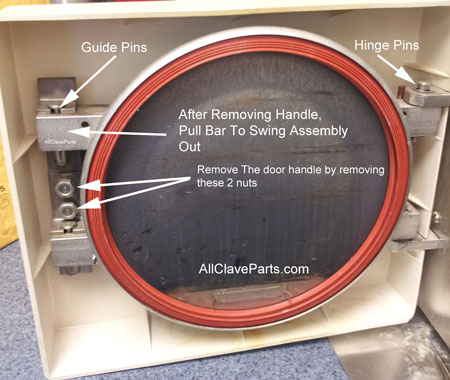
- Remove the door handle by removing the 2 screws as shown in the picture above
- As you are facing the inside of the rear open door, pull on the top bar (notice the slots for the pins to move in and out – and the hinge pins on the right that allows it to swing open
- After swinging the assembly open, you will see a nut and washer sticking through the center of the plate as shown in the picture below
- Remove the nut & washer, slide the disk off and remove the old insulation pad
How To Install The New Insulation Pad
To install the new Insulation Pad, replace the old pad with the new by aligning the hole in the pad with the screw on the plate, and simply follow the above instructions in reverse order
That’s it!