Quantcast
Channel: Autoclave Repair Tips
Viewing all 272 articles
Browse latest View live

3 Reasons For The Statim 2000 Cycle Fault 3

$
0
0


There are 3 reasons the Statim 2000 Autoclave will give the Cycle Fault 3 Error:

  1. There is a problem with the solenoid valve or
  2. There is a problem with the cassette or
  3. There is a problem with the Thermocouple

Statim 2000 Autoclave Cycle Fault 3 -Steam Leaking Around Cassette

If there is steam leaking from around the cassette prior to getting the cycle fault 3, then the solenoid is most likely not the problem.
In this article, we will be addressing when the error code is accompanied with steam leaking around the cassette

4 Tips Why The Statim 2000 Is Leaking Steam around the Cassette

The easiest way to narrow down the problem quickly, is to try using a cassette you know is good. If the problem still exists, then you can skip down to the thermocouple. If the problem goes away, then you know it is something to do with the cassette

If, when operating the Statim 2000 Autoclave you see steam escaping from around the cassette, there are 4 possible causes

  1. The Cassette Seal is worn out and needs to be replaced
  2. The Cassette hinge is malformed
  3. The Cassette has worn out
  4. The Thermocouple has been bent or broken

Statim 2000 Cassette Seal

According to Scican, the manufacturer of the Statim 2000 Autoclave, the Cassette Seal should be replaced after every 800 cycles.

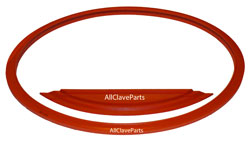
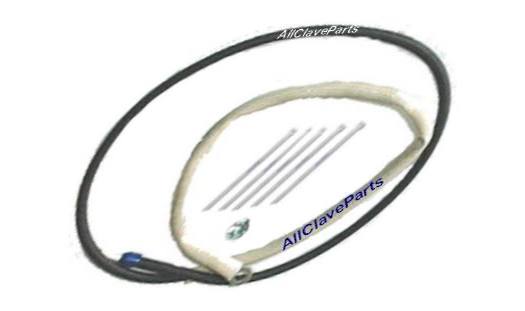
Picture of the Statim 2000 Cassette Seal With Lubricant Offered By AllClaveParts.com

Do not be quick to dismiss the seal as the possible source of the problem because of its appearance. They can look brand new and still be faulty. Over time with the repeated heat up and cool down extremes, the seal will shrink.

The shrinkage is not enough that you can see it, but using a micrometer, the shrinkage can be measured

If you have installed a new cassette seal and steam is still leaking around the cassette, remove it and reinstall it. Be sure to use the liquid soap on the seal when installing it (and at least monthly thereafter). Make sure both little nubs are protruding in each corner (uncovered)

Also make sure the holes in the seal and the rear of the cassette line up

Sometimes, the cassette seal needs to be removed and reinstalled 2 or 3 times before you get it right

Caveat Emptor: It is also possible you are using a defective seal

The Statim 2000 Cassette Hinge is Malformed

When you insert the tab from the top of the cassette into the opening on the bottom cassette, they form a hinge.

When looking at the hinge, the two parts should be close together as shown in the picture below. If the bottom tab (which is the top part of the formed hinge) is arched upwards, you can try realigning it by following the directions you will find by clicking here.
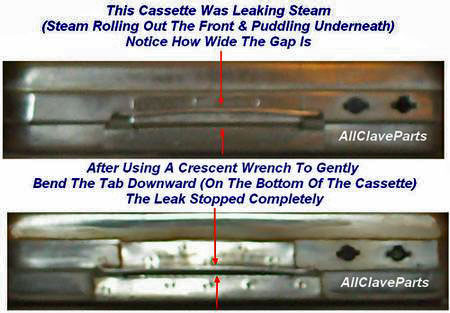
Correct Alignment of the Statim 2000 Cassette Hinge

The Statim 2000 Cassette Has Worn Out

The Statim 2000 Cassette is well made, but over time they will eventually wear out (over years) and will need to be replaced.

Statim 2000 Thermocouple

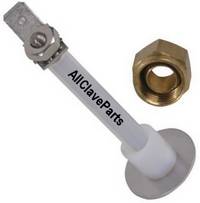
Picture of Statim 2000 Thermocouple

The end of the thermocouple protrudes inside the rear left corner (as you are facing the autoclave). With a flashlight, look inside the cassette bay. You should see a pin (the end of the thermocouple, and it should be in the center of the opening and point slightly up as shown in the picture below.

Correct Positioning of the Statim 2000 Thermocouple Pin

If the pin is bent or broken off, the thermocouple will have to be replaced

Most of the time, the pin being broken or bent is a result of inserting the cassette upside down (instead of the pin lining up with the hole that allows it to be inserted into the cassette, it meets with metal and bends or breaks)

Any of these Statim 2000 Autoclave repairs are something you should be able to do with the Free Technical Support and Guaranteed High Quality Replacement Parts available from AllClaveParts.com
Why Your Tuttnauer 2540M Autoclave Fuse Holder Melted

$
0
0


Troubleshooting The Melting Of the Tuttnauer 2540M Autoclave Fuse Holder

Note: While this is written specifically for the Tuttnauer 2540M Autoclave, this article and it’s instructions are applicable for all Tuttnauer Autoclaves that use fuse holders

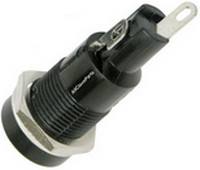
Picture of the Tuttnauer 2540M Fuse Holder

"If the fuse holder on your Tuttnauer 2540M Autoclave has melted, it is imperative you determine what caused it to melt before replacing it. Otherwise, replacing the fuse holder is just throwing your money away"

So to get started, let’s think this through: if the fuse holder has melted, and nothing else….then it is highly unlikely heat from the autoclave caused it to melt. The only possible explanation has to be an electrical problem is the source of the excessive heat.

And, there are only 2 possible causes for the fuse holder to get hot enough to melt

1. There is a short somewhere within the electrical system of the autoclave , or
2. You suffered a power surge (or spike) coming in through the wall outlet where the autoclave is plugged in

How to Find a Short in the Tuttnauer 2540M Autoclave

Before getting started, the first thing you will want to do is to remove the cabinet from the autoclave, so you have access to all of the internal components & wiring. Then proceed as follows:

• The most likely cause is a short in one or more of the Heating Elements. So start by testing them first (test all four). You can find simple step by step instructions by Clicking Here and scrolling down the page
• Next, you will want to check all of the wiring for broke, charred or loose wires. It is a good practice to give each wire a gentle tug in both directions to locate any breaks or loose wires. Replace or tighten the connections on any defective wiring found

Did a Power Surge (or Spike) From the Wall Outlet Cause The Tuttnauer 2540M Fuse Holder To Melt?

If you are unable to locate any short circuits from the above procedures, then the circuit your autoclave is on most likely experienced a power surge or power spike

And the best thing you can do is to take the necessary steps to prevent it from happening again

• Make sure the autoclave is plugged into a dedicated circuit
• Make sure the circuit has a GFI outlet installed either at the circuit breaker (preferable), or through the wall outlet

A Note about GFI Outlets & Your Tuttnauer 2540M Autoclave

The type of GFI outlets that come in strips and plug into your wall outlet (and the plug from the autoclave is plugged into an outlet on the strip) is not the best case scenario.

We have received many reports of instances where these outlet strips fail to protect the autoclave

What to Do If You Cannot Find the Cause of The Fuse Holder Melting on Your Tuttnauer 2540M Autoclave

If you cannot locate the problem:
1. The heating elements on your Tuttnauer 2540M Autoclave test out good
2. You did not find any loose or broken wires
3. And if you already have a good GFI outlet installed and it did not trip
then it would be a good idea to visit AllClaveParts for free technical support

Midmark M11 Error Code E001

$
0
0

Just received an email with a Midmark M11 Autoclave Repair question. I get so excited when someone asks for our help.

It gives me the opportunity to work with someone new, and allows me the luxury of examining a problem from someone else’s perspective…..forcing me to look at it in a different way.

Here is the email I received:

I have a Midmark M11 Ultraclave and after our monthly cleaning we keep getting error code 1. We have done everything recommended in our trouble shooting manual. Don’t want a costly repair can you help?

The Problem: Midmark M11 Displaying Error Code E001

In most cases, we are simply told about the Error E001 without any additional detail. Which is fine. And we respond with a laundry list of things that could be causing the problem and start the troubleshooting process.

But in this case, they told us it started happening right after they cleaned it. With the extra detail in this email, we can hone in on the problem with the Midmark M11 Autoclave pretty quickly.

The Cause: The Midmark M11 Water Level Sensor

You can find the water level sensor by Clicking Here

We immediately suspected the Water Level Sensor was causing the problem.

A Picture of the Midmark M11 Autoclave Water Level Sensor

And here is what we think happened: When wiping everything down, the water level sensor in the back of the chamber got wet, and remained that way.

The Midmark M11 Water Level Sensor has 1 wire going to it, and it is a hot wire. In order for a circuit to be complete, you also have to have a ground. When water touches the end of the sensor, it completes the circuit and sends the message back to the PC board that there is sufficient water in the chamber to start the sterilization process.

If the sensor is wet when the cycle is started, the circuit is complete as far as the PC Control Board is concerned and it will skip the fill process and immediately go into the startup phase (heat).

Without any water in the chamber, it will overheat pretty quickly causing the overheat thermostat to cut the power to the heating element, and trigger the E001 error code

Is it Really The Problem?

Verifying the problem could not be easier. Simply start the cycle and watch your display. If it bypasses the Filling process (ie: The LCD Display should say Filling”) and goes straight to the heat up mode instead…..then the Water level Sensor is causing the problem.

In this case, we were told the Midmark M11 autoclave was skipping the filling cycle

And the cure in this case was to simply remove the base tray and cage to get to the sensor, and then dry the sensor with a cloth

Where the Water Level Sensor Is Located Inside the Midmark M11 Autoclave Chamber

As a foot note, had drying the sensor not cured the problem, then the next step would have been to test the Water Level Sensor. You can find the test by clicking here.

They were able to successfully complete the autoclave repair on their Midmark M11, and it did not cost them a dime!

Statim 2000 – Water Quality Is Not Acceptable

$
0
0


What To Do When Your Statim 2000 Autoclave Tells You The Water Quality is Not Acceptable

Here is a transcript of an email conversation we had with a client regarding her Statim 2000 Autoclave

On 4/23/2014 9:31 AM, Leone wrote

Question"Good Morning, my name is Leone from a dental office. We
use a Statim 2000, and we accidentally put in Spring Water instead of Distilled

The statim notified us that it was the wrong water and would not begin the
cycle. We drained the water and replaced it with Distilled but it is still
saying it is the wrong water and will not run the cycle.

How can we remedy this?

Thank you,

Leone"

On Wed, Apr 23, 2014 at 10:46 AM, Wally wrote:

Answer This happens more than you might think. At the supermarkets & most stores, the Spring Water is located on the same shelves as the Distilled Water, and the labels are pretty similar.
And, most people think it is the same thing, when it is not

For you to get this kind of error means your Statim 2000 is equipped with a Water Quality Sensor, and the autoclave can definitely tell the difference between the two.
You would not think the problem would show up with the first use of the spring water, but the sensor is very sensitive and will not allow the water to go through the
autoclave

The sensor is located inside the water reservoir. Remove the lid and look inside the reservoir, and you will see 2 pins. The pins are part of the Water Quality Sensor Assembly

Now that you know where the Sensor is located, here is what you need to do

  1. First, start by draining the water from the reservoir
  2. Then try cleaning the pins with alcohol using a long handle Q tip (Since you are a dental office, the swabs you use to apply numbing agents will work perfectly)
  3. Allow the pins to dry
  4. Refill the water reservoir with distilled water and try again. The problem should go away

If you have any questions, please just let me know

Wally

Ps. To keep from running into this problem ever again, you might want to keep a Water Quality Sensor (Click Here to See It) on hand, where you can test the quality of the water before you use it

On Thu, Apr 24, 2014 at 9:39 AM, Wally wrote:

Question: Just checking, did you get the Water Quality Not Acceptable issue on your Statim 2000 autoclave resolved?

Wally

On 4/24/2014 8:45 AM, Leone wrote:

Answer: Yes We Did!

Thank you so much, your advice worked perfectly. I appreciate your prompt response to me email. All the best to you

Leone

Leone Saved the Cost of a Service Call For The Statim 2000 Autoclave Repair

Leone is from New York, and our understanding is that the normal charge for her office is $150.00 for an autoclave repair tech to come by and take a look

And, she would have had to wait for the tech to work it into his schedule and get there. As a result, in addition to the $150.00, she would have suffered a considerable amount of down time, even if he would have arrived on the same day

But with our help, she got it up and running in a matter of minutes….and it cost her nothing!

For More Great Help Troubleshooting Your Statim 2000 Autoclave, visit www.AllClaveParts.com

Tuttnauer Autoclave Air Jet Valve….. Black Top or Red Top?

$
0
0

What Does it Mean and … If the Color Is Missing … How Do You Know Which One to Get?

There is nothing more frustrating than to buy a part for your autoclave, and when you get it…it turns out to be the wrong thing

The Black Top and Red Top designation on Tuttnauer Air Jet Valves is a quick way for Tuttnauer Autoclave Repair Technicians (& now you) to know which
valve your autoclave uses

Tuttnauer Safety Valve Holder Assembly

For quick identification purposes, they simply put a small blob of paint (red or black) on the hex head

It is important to note, even though your particular model may call for a specific color valve, it does not mean it is the one used in your autoclave, and here is why:

If during production, they were out of the correct valve for a particular unit, they would simply substitute the entire Saftey Valve Holder assembly with whatever they had on hand

What makes them different is the width of the end that has the threads on it that screw into
the safety valve holder. Buy the wrong one and it will not fit. So, if the color is missing, you must take the time to identify the correct valve for your Tuttnauer Autoclave.

How To Know You Are Getting the Right Air Jet Valve for Your Tuttnauer Autoclave

The air jet valve is located inside the water reservoir and is screwed into the side of the safety valve holder. Just look for the small hand grenade style ring

You will need a 10mm wrench to remove the valve. Simply unscrew the valve by turning it counterclockwise

Once removed, use a ruler, a tape measure, or calipers and measure across the bottom of the end with the threads

If it measures 0.375 (3/8) inch, it is a Black Top (Click Here & find the one for your model). If it measures 0.25 (1/4) inch, it is a Red Top (Click Here & find the one for your model)

Black Top 1/8-28 BSP

The description for the Black Top Air Jet Valve is kind of counterintuitive. It reads 1/8-28 BSP thread. At first glance, you just notice the 1/8 and
presume that means it is 1/8" in diameter. Wrong. I have to admit, I made this mistake myself.

The 1/8 is designating the thread size, not the diameter and the 28 indicates the "thread pitch" (or angle), and the BSP means "British Standard Pipe"

While others who do not fully understand, or do not want you to attempt the repair, will tell you that you need a thread gauge in order to know for sure which Tuttnauer Air Jet Valve you need, the truth is you don’t.

Following the directions above, you simply need a ruler

You see, when we say "Autoclave Repair Made Simple" ™, we really mean it!

Visit AllClaveParts.com for a full line of Tuttnauer Autoclave Repair Parts, and Free Technical Support!

How To Replace The Pelton Crane Delta XL8 Door Insulation Pad

$
0
0

Replacing The Door Insulation Pad Could Not Be Easier With These Simple Instructions

Note: While these instructions are specific for replacing the Delta XL8 Insulation Pad, they are exactly the same for the Delta 8, the Delta Q8, the Validator 8, and the Validator Plus 8. The Pelton Crane Part Number for these models are identical: OEM Part #1539514 (the earliest models had a part number of #0211812)

You can click here to find the replacement Door Insulation Pad for your model autoclave

The Delta XL8 Autoclave has an Insulation Pad tucked away inside it’s door assembly

As its name implies, its function is to help insulate the door. It is a round disk made of a ceramic paper

After years of use, one of two things generally happen:

  1. It gets thinner (or breaks down) and loses some of its insulating capabilities
  2. It sometimes manages to fold in on itself (wrinkles are literally folds

While we do not currently fully understand how, when either of the 2 above conditions above exist, the door can begin to leak during a cycle. The leak is usually water and not steam. So, if you have replaced the door gasket and spacer, and it is still leaking around the door (dripping water from the bottom)…the insulation pad is the most likely cause

Replacing the Insulation Pad is pretty simple and straight forward. The only tools you will need are a couple of wrenches and a screwdriver to complete the procedure

To find the replacement Door Insulation Pad for the Delta XL8 Autoclave, Click Here

Follow these simple instructions to replace the pad

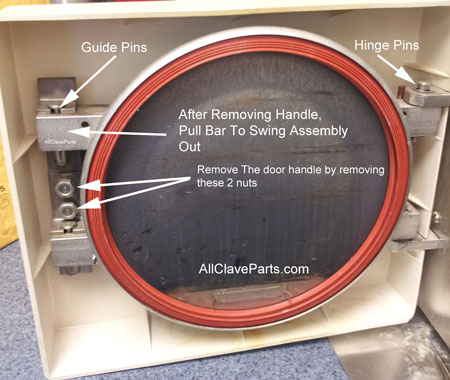
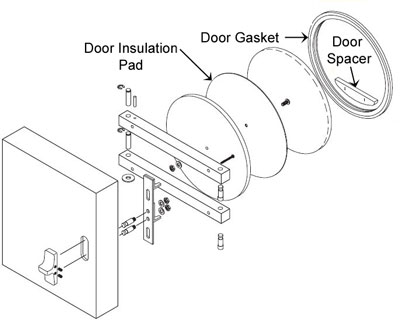
Delta XL8 Door Assembly

How To Remove The Old Insulation Pad From The Delta XL8 Autoclave

The first thing you will need to do is to remove the old pad. To do this:

  1. Remove the door handle by removing the 2 screws as shown in the picture above
  2. As you are facing the inside of the rear open door, pull on the top bar (notice the slots for the pins to move in and out – and the hinge pins on the right that allows it to swing open
  3. After swinging the assembly open, you will see a nut and washer sticking through the center of the plate as shown in the picture below
  4. Remove the nut & washer, slide the disk off and remove the old insulation pad

How To Install The New Insulation Pad

To install the new Insulation Pad, replace the old pad with the new by aligning the hole in the pad with the screw on the plate, and simply follow the above instructions in reverse order

That’s it!

Delta XL8 Insulation Pad Location

Why Pouches remain wet after drying on the Statim 2000 Autoclave

$
0
0

First, it should be noted, handling the pouches when they are wet will compromise the sterility of the instruments being sterilized (the pouches are
permeable and will allow bacteria from your hands to wick through to the instruments)

You can view even more Statim 2000 Troubleshooting Guides on AllClaveParts.com by Clicking Here

There are several possible causes for the pouches being wet after going through the drying cycle on the Statim 2000 Autoclaves

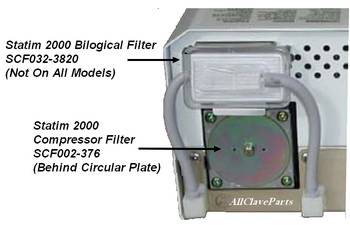
  1. The air filter(s) are dirty. The compressor air filter is located under the round metal plate on the back of the autoclave. There is a screw in the middle of the
    plate holding it in place. Using a phillips screwdriver, remove the screw, and then the plate. The filter is made of foam and is shaped like a donut.
    Remove the filter. If the filter is dirty, replace it.
  • Scican (Statim) recommends the filter be replaced every three months

Newer units also have a Biological Filter. Like the Air Compressor Filter, if it gets dirty, it can impede the air flow and restrict drying. It too should be
replaced on a regular basis

  • Ensure that cassette is clean and has been treated with Stat Dri™ or Sci-Dry™ (offered by AllClaveParts)
  • The Biological Filter should be replaced every 6 months or 500 cycles, whichever comes first

Statim 2000 Air Compressor & Biological Filters Picture
  • The Drain Tube is Restricted. The Drain Tube must run directly to condenser bottle with no dips, loops or kinks.
  • Pouches are stacked. Pouches should be only 1 level deep. Do not stack them. The air must be able to circulate around the pouches freely
  • Wire Rack is lying flat. Make sure the wire mesh rack inside the cassette is inverted. This provides a space below the wraps for the air to flow and dry the bottom side of the pouches
  • Autoclave is not level. Check the Bubble Level on the Statim cabinet. Set the bubble to the 4:00 or 5:00 position by turning the front leveling legs
  • Airflow is restricted. Check for airflow through the autoclave. While the Statim 2000 is running in the drying cycle remove the exhaust tubing from the top of the waste bottle
    (be careful tubing may be hot). Place tubing into a cup of water, vigorous bubbles should appear in the cup of water. If bubbles do not appear, check
    airflow from compressor to waste bottle.
  • Air Compressor Is Not turning On. Make sure the compressor is running during the drying cycle. You should be able to hear it running and you can also feel it running by placing
    your hand on top of the cabinet (in line with the air compressor filters)
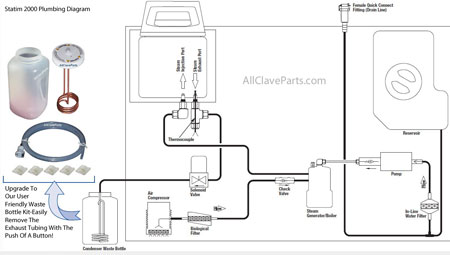
  • Statim 2000 Plumbing Diagram

    Statim 2000 Autoclave Does Not Power Up

    $
    0
    0

    It can be very frustrating when you turn on your Statim 2000 Autoclave & nothing happens

    But, like all other autoclave troubleshooting, it’s just a matter of knowing where to start to find & fix the problem

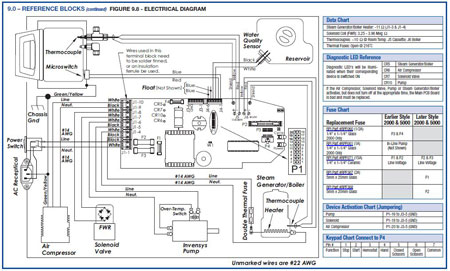
    We have two set of procedures here, and to find the one applicable to your autoclave, you will need to know which software revision your unit has. Discovering the software revision is fairly simple. Just Click Here and follow the instructions

    Once you know the software revision, just find it on this page and follow the directions

    No Power To Statim with Software Rev. 3.0 or 4.2

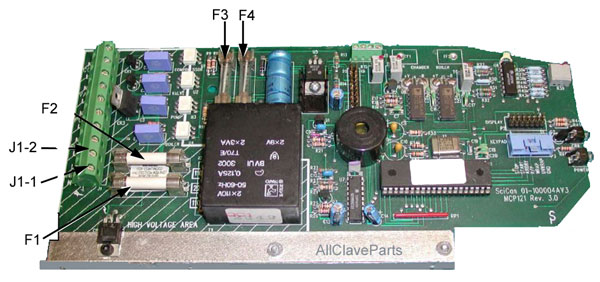
    Statim PCB Board 3.0
    1. Verify that there is no display and no green power light
    2. Check outlet to make sure there is power to the outlet (check circuit breaker)
    3. Verify power switch is turned ON
    4. With power switch OFF check all fuses for continuity. If fuse(s) are not continuous, then they have blown and need to be replaced
    5. Turn main power switch ON
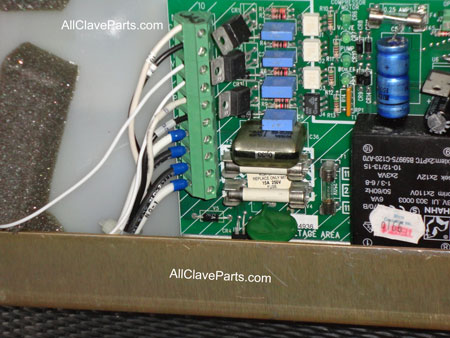
    6. Using a voltmeter check for line voltage at bottom two terminals on the left side of the PCB, J1-1 and J1-2. If line voltage is present proceed to step 7. If not check for burnt wiring from power cord to the power switch to the PCB
    7. Check For line voltage on the left side of the two 15 amp fuses. Place one meter lead on the left side of the upper fuse (F1) and one meter lead on the left side of the lower fuse (F2). If line voltage is present proceed to step 8. If not check the PCB for a bad connection between terminal J1-1 and the lower 15 amp fuse (F2) or terminal J1-2 and the upper 15 amp fuse (F1)
    8. Check for line voltage on the right side of the two 15 amp fuses. Place one meter lead on the right side of the upper fuse (F1) and one meter lead on the right side of the lower fuse (F2). If line voltage is present the Printed Circuit Board (PCB) is bad. If line voltage is not present recheck the 15 amp fuses or check for a bad connection at the fuse holders

    You can find more Statim 2000 Autoclave Repair & Troubleshooting guides by Click Here

    No Power To Statim 2000 with Software Revision 2.4 – 2.92 & 6.4

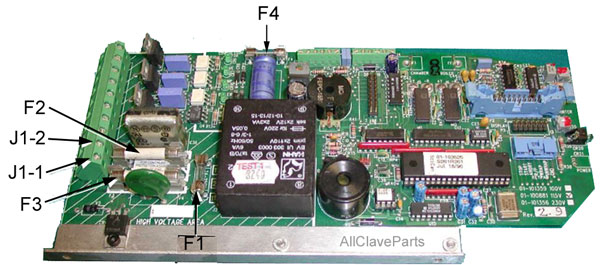
    Statim 2000 PCB Board 2.9
    1. Verify that there is no display and no green power light
    2. Check outlet to make sure there is power
    3. Check that power cord is plugged into electrical outlet and back of Statim
    4. Verify power switch is turned ON
    5. With power switch OFF, check all fuses for continuity. If they are not continuous, then the fuse(s) have blown and will need to be replaced
    6. Turn power switch ON
    7. Using a voltmeter check for line voltage at bottom two terminals on the left side of the PCB, J1-1 and J1-2. If line voltage is present proceed to step 8. If not check for burnt wiring from power cord to the power switch to the PCB
    8. Check for line voltage on the left side of the two 15 amp fuses. Place one meter lead on the left side of the upper fuse (F2) and one meter lead on the left side on the lower fuse (F3). If line voltage is present proceed to step 9. If not check the PCB for a bad connection between Terminal J1-1 and the lower 15 amp fuse (F3) or terminal J1-2 and the upper 15 amp fuse (F2)
    9. Check for line voltage on the right side of the two 15 amp fuses. Place one meter lead on the right side of the upper fuse (F2) and one meter lead on the right side of the lower fuse (F3). If line voltage is present the Printed Circuit Board (PCB) is bad. If line voltage is not present recheck 15 amp fuses or check for bad connection at fuse holders


    The Case of the Powerless Statim 2000 Autoclave

    $
    0
    0

    In our continuing effort to bring you everything you need to troubleshoot & do your own autoclave repair, here is an unusual problem we encountered recently

    Despite walking our client through the normal troubleshooting process, he was still unable to get his Statim 2000 to power up.

    So, he took the lead and not only did he find the problem, he was able to fix it! And, he was kind enough to share his experience with us, which we are now sharing with you.

    The Statim 2000 is Getting Power, but It’s Still Dead….Now What?

    After tracing the power from the wall outlet following our “No Power Troubleshooting Guide” (Click Here to see the procedures), our client was able to determine power was flowing all the way to the PC Board

    Now, I have to admit, when there is problem with the PC Board on an older Statim 2000 (which appeared to be the case here), we usually encourage people to either buy the Digital Electronics course and try to repair the board themselves (you can view the course offering by clicking here), or to replace the autoclave

    But, the Dentist believed it had to be something simple, and he asked a patient of his (who is also a retired electrical engineer) to take a look a look at it.

    Where Does It End?

    The Electrician first retraced all of the steps we had given him, confirming that there was electricity present from the wall to the Terminal Block on the PC Board, where it simply stopped. There was not any power present anywhere on the board itself

    Knowing the power was making it to the board, but not flowing on from there, they knew it had to be the power connections to the board. They placed a jumper wire on the power connections to bridge the connection and tried a cycle. The power came back on and it completed the cycle successfully

    The Case of the Powerless Statim is Solved

    So, they removed the board from the Statim & inspected the back of the board

    Sure enough, they found a broken solder joint where the power lines connect to the board. So, the Dentist got his soldering gun and carefully put more solder in place. He then re-installed the board


    Click Here For A Larger Image

    After putting everything back together, he ran another test cycle. The power was restored, it completed the cycle, and now the Dentist’s Statim is once again sterilizing his instruments

    Had he not taken the initiative, the Dentist would have ended up replacing the autoclave. Even if he sent it off for repair, most repair facilities would have stopped at the board, and not taken the extra step of removing and examining it. They would have simply recommended replacing the autoclave.

    Lessons Learned From This True Story

    1. Don’t be afraid to ask for help (and that includes asking us!)
    2. Don’t give up easily. Use logic and your critical thinking skills (if this, then that) to think it through

    After all, if the Statim 2000 Autoclave is destined to become a boat anchor anyway, what can you hurt?

    OCR Autoclave Repair: The Case of the Mysterious Door Leak

    $
    0
    0

    Any time there is a leak around the door on the Pelton Crane OCR Autoclave, everyone automatically assumes it is due to a faulty door gasket

    And for the most part, they are usually right

    But what if replacing the door gasket doesn’t fix it?

    Here is how to find & fix the problem

    What To Do If Replacing The Door Gasket Doesn’t Fix the Pelton Crane OCR Steam Leak Around the Door

    First, Even if you just replaced it, let’s make sure you did not get a defective (or used) door gasket. Most door gaskets will look like new, even when they are old & well used. The fact of the matter is, they don’t really wear out

    The real problem is they will actually shrink a little bit. Not enough that you can notice the shrinkage, but enough to allow steam to get by. So just inspecting the door gasket won’t tell you whether it is good or bad, unless it has a tear in it

    Regardless, remove the gasket from the door and make sure the grove it fits in is clean, as well as the mating surface on the cabinet. It doesn’t take much, a little debris can cause it to leak

    Also, wipe down the door gasket before re-installing it to remove any debris that may have stuck to it

    If you need a new one, click here to make sure you get a new, High Quality OCR Door Gasket

    Now try a cycle, and make a note of where the steam is escaping from around the door. Then rotate the gasket & try another cycle

    If the steam follows the rotation, then the problem is with the door gasket. Replacing it with a new one should eliminate the problem

    But what if the steam leak does not follow the gasket when you rotate it…then what?

    Probable Cause

    There are several possible causes

    1. Open the chamber door 90°
    2. Lift up on the door
    3. If the door tilts in, or moves, then the hinge pins have worn and need to be replaced. This is the most common problem next to the door gasket. However, if the door is solid and does not move, then go to step 4. You can Click Here For Replacement Hinge Pins.
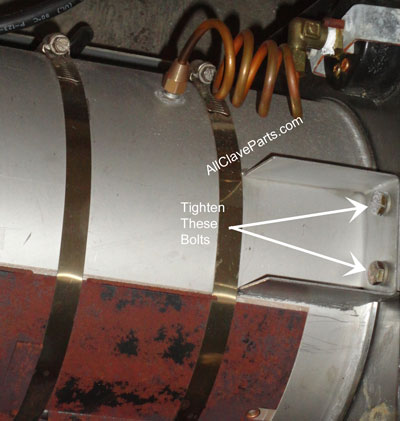
    4. Remove the cabinet. Towards the front of the chamber, about midway up, there is a U Shaped Bracket on each side that holds the chamber in place as shown in the picture below. Make sure the bolts have not loosened. Make sure the brackets have not slipped from their place. If needed, move brackets back into place and then re-tighten the bolts. Repeat for other side of chamber.

    These steps should resolve about 99% of the causes for steam to be leaking around the door on your Pelton Crane OCR autoclave. But, if it doesn’t solve your problem, just let us know

    Midmark M11 Autoclave Repair – Top 4 Problems & Fixes For Error Code C983

    $
    0
    0

    Pressure Leaks & Error Code C983

    Pressure Leaks are the most common cause of the error code C983 on newer model Midmark M11 autoclaves (M11-020 thru -022 with Serial # prefixes RS, RT, RV & V).

    But what exactly is a Pressure Leak?

    A pressure leak is any leak of steam, air or water within the autoclave. Here are the four most common causes:

    A faulty Door or Dam Gasket

    Is the door or dam gasket leaking on your Midmark M11?

    If you can see steam coming out anywhere around the door, the door or dam gasket is the cause and they both should be replaced

    Midmark recommends replacing both gaskets at least every 12 months. Find the High quality M11 Door & Dam Gaskets by Clicking Here

    A faulty Air Valve

    This is the part you need if Steam is leaking From the End Of Condensation Coil

    A properly functioning Air Valve removes air from the chamber. When it senses air, it opens and allows air from the chamber to pass through to the Water Reservoir

    When it senses steam, it closes and seals the chamber. When the Air Valve is defective on the Midmark M11 Autoclave, it either will not close, or will not open, or opens to soon.

    A faulty Vent Valve

    This is the part you need if water is leaking from the end of the Condensation Coil

    The Vent Valve is designed to open at the end of the cycle, allowing the steam to enter the condensation coil inside the Water Reservoir

    Once the steam travels through the coil, it is cooled down enough to return the from a gaseous state, back into the liquid state (water)

    A faulty Fill Valve

    This is the part you need if you see bubbles coming from the Bottom of the Water Reservoir

    The fill valve opens at the beginning of the cycle when the display reads “FILLING,” and then shuts off and seals when water touches the Water Level Sensor located inside, and to the rear of the chamber

    While a problem with the Door & Dam Gasket is obvious and easy to see, finding a leaking valve will require a little more investigation, but is not difficult.

    How To Find The Faulty Valve on Your Midmark M11 Autoclave

    The first thing you will need to do is remove the left side panel (as you are facing the autoclave (the side where you put the water in). You can find the instructions for removing the panel by Clicking Here.

    Once the panel is removed, you will see the two reservoirs, the larger reservoir is the one you are interested in. On top of the reservoir is a lid. Remove the lid by sliding it to the rear and get it out of the way.

    Inside the reservoir, you will see the condensation coil. There is a hook on the end of the reservoir that sticks out above the water line. The end of that hook is one of the places you are going to be watching (a dental mirror can come in handy here). The other place is the bottom of the reservoir

    Now, start a cycle and when the temperature gets ~240 degrees

    Warning, be careful, the water can be hot and there can be live steam inside the reservoir. Follow safety precautions

    First, look for bubbling coming from the bottom of the reservoir. If you see bubbles, then the fill valve is defective and needs to be replaced.

    If you do not see bubbles, then start watching the end of the hook on the coil

    What's Coming out of the End Of The Coil?

    You are looking for steam or water to be coming out of the coil. If you see steam coming out, then the air valve is defective and needs to be replaced. But, if you see water, then the vent valve is defective and needs to be replaced

    Once you have found the pressure leak and replaced the defective part(s)on your Midmark autoclave, the error code should go away and the operation returned to normal

    Statim 5000 Autoclave Repair: The Case of the Wet Instruments & the Noisy Compressor

    $
    0
    0

    We got a call last week from a dentist who told us the Air Compressor on his Statim 5000 was making a loud noise. He also told us the instruments he was sterilizing were coming out wet

    Statim 5000 Autoclave

    Both of these items together tell us there is definitely a problem with his Compressor.

    The dentist ran a cycle and when it reached the drying phase, he held the phone close to the compressor so we could hear the noise it was making.

    The noise sounded an awful lot like the sounds the water pump makes on the Statim 5000 autoclave when first starting a cycle.

    With almost a thousand dollar price tag for the Air Compressor, he was frantically looking for another option.

    After quizzing him about his maintenance routine, we found it had been a very long time since he had changed the biological filter (which is supposed to be replaced every 500 cycles – or 6 months, whichever comes first).

    Statim 5000 Filters Location

    The biological filter is on the autoclave to remove any remaining living organisms from the air before sending it on into the cassette…. keeping the sterilized instruments sterile

    The Biological Filter works very well, and will eventually collect enough debris to become clogged, if not replaced on a regular basis. And that is what we suspected in this case

    So we had him remove the Biological Filter, and connect the two hoses going to it together with a ¼ inch barbed fitting. Then, we had him run a cycle.

    Instead of spending $1000.00 on a new compressor all he needed was a $47.00 Biological Filter

    The end result: The noise had gone away, and the instruments came out dry. Problem solved!

    Note: You should not run the Statim 5000 Autoclave without the Biological Filter in place. We prescribed this procedure of bypassing it only to verify the filter was the problem.

    Had he continued to run the autoclave without replacing the filter, his compressor would have soon broke down and would have required replacement

    "On Your Statim 5000 Autoclave, an ounce of prevention is worth a pound of cure"

    You can find everything you need for preventative maintenance of your Statim 5000 autoclave by clicking here

    The Complete Statim 5000 Preventative Maintenance Kit

    The moral of the story is: Do not cheap out on the Preventative Maintenance of your Statim 5000 autoclave (or any other autoclave for that matter)

    While it may seem these parts & procedures are only to keep revenue rolling in for the seller, it is not the case.

    Like any other piece of equipment you have, preventative maintenance should be done on a regular basis, to keep it running at it’s optimum and to greatly extend its lifespan.

    You can Click here for even more free troubleshooting guides & technical support

    What you need to know auto the fuses in your autoclave

    $
    0
    0


    Autoclave Fuses

    In addition to the articles you find here, be sure to visit the troubleshooting section of AllClaveParts.com (Click here and simply select the Make & Model of your Autoclave) for autoclave repair help you can really use

    Fuses are an important facet to troubleshooting autoclave problems. You need to understand what they do and you need to know how to select the right replacements

    Fuses in your autoclave, like in any other electrical device, are there to protect your electronics from being damaged by things like electrical shorts and power surges

    Tuttnauer Autoclave Power Supply Fuses

    We frequently get calls about autoclave fuses. Where one or more have blown and the question is always can they get them locally instead of ordering them from us.

    And some of the calls are from people who have already replaced the fuse with replacements they got locally, and are blown out shortly after installing them. This leads them to believe something is causing them to blow….like an electrical short somewhere within the autoclave.

    While an electrical short is possible, in most cases the new ones are blowing because they replaced the old one with the wrong fuse

    If fuses are all you need, then we do encourage you to buy them locally. By doing so, you can avoid the expensive shipping costs and the even more expensive downtime. But before buying a replacement, you need to know exactly which fuse you need

    All of the fuses installed in autoclaves are marked on the silver ends telling what size they are. They will have markings like: 2A 250V.

    This means the fuse is rated at 2 Amps and up to 250 Volts. So, going to any hardware store with this rating in hand, you will find what look like suitable replacements. And this is what most folks do.

    And they invariably end up with the wrong fuse. But you think, all 2 amp, 250v fuses are the same….right?

    Wrong!

    What is missing is the fuses reaction time – that is, what happens (how long) before the fuse blows?

    All fuses in your autoclave will have one or two letters in front of the amperage rating. These letters are extremely important and tell you what their reaction time is. Not matching the fuses with the proper reaction time is where everyone goes wrong. It is always good to look at the fuses location on the circuit board to make sure you get the right fuse.

    If you can’t find your fuses locally, then visit AllClaveParts to find what you need

    Let’s take a look at a Tuttnauer Power Supply Board

    Tuttnauer Power Supply Board

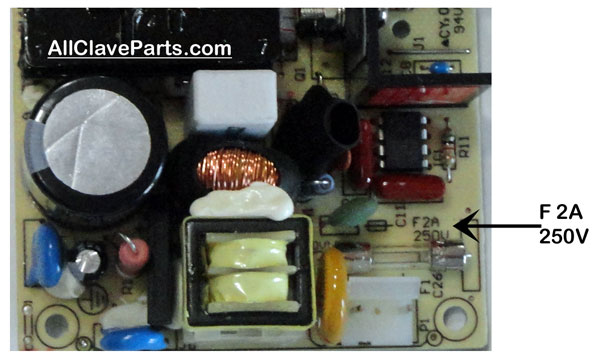
    Sometimes the circuit boards will be marked with the correct amperage ratings and the letters as well as shown below

    Picture Showing Fuse Rating on Tuttnauer Power Suppy Board

    Let’s take a look at what the readings on your fuse might look like. In this case, the Tuttnauer Power Supply Board is showing a rating of
    F 2A 250V

    Since we already know what the 2A, 2 50V means, the letter F should be our focus.

    So what are these letters and what do they mean?

    The first letter(s) (TT, T, M, F, FF) tell you what type of fuse it is and what you should be looking for

    • FF = Fast Fast. Very Quick Acting. (also known as Anti Surge)
    • F = Fast. Quick Acting (also known as Anti Surge). Typically open in less than 20 ms @ ten times the rated current
    • M = Medium. “Normal” or Very Short Delay (Typically open between 50 and 90 ms @ ten times the rated current)
    • T = Time. Time Delay or Slow Blow. Typically open between 100 and 300 ms @ ten times the rated current
    • TT = Time Time. Long Time Delay or Very Slow Blow.

    So, if you were looking to replace the fuse in the Tuttnauer Power Supply Board shown above, you would be looking for a F 2A, 250V fuse: a Fast Acting, 2 Amp, 250 Volt fuse

    Almost any electrical supply store in your area should have these fuses. Just make sure you know the reaction time (Letter) of the fuse you are replacing and the length of the fuse as well

    Note: We have seen instances where people have simply replaced the fuses with ones with an increased size amperage rating to keep them from blowing.

    This is something you should never do! You are putting your safety and your autoclave at risk

    Years ago, when I was growing up, most homes had a fuse box instead of a circuit breaker (yes, I am that old). Everyone kept extra fuses on hand in case one or more failed. And that is still a good practice today for your autoclave.

    The next time you place an order for autoclave repair or maintenance parts for your autoclave from us, order some extra fuses….and you will always be prepared!

    The Case of the Whistling Statim Cassette

    $
    0
    0


    Another Episode from our exciting Statim Autoclave Repair Series

    Here is a note we recently received from a client:

    “I replaced the seal on my Statim 2000 Monday the 9th of March. It had developed an intermittent whistle while heating. It stops whistling when the sterilizing temperature is reached.

    The instrument packages show sterile at the end of the cycle. I replaced the seal partly because the old seal was whistling and partly because the old seal was leaking steam. The steam has subsided but the whistle remains.

    What is a probable cause and what do I need to do to stop the intermittent whistle?
    Any help would be appreciated.”

    We are glad you asked Jack. First, when you notice steam leaking from the cassette, lubricate or replace it immediately. Failure to get rid of the leak can cause major problems….not to mention your sterility can be compromised

    While whistling can be an enjoyable thing…..whistling from your Statim Cassette can be a real annoyance….driving you & your staff absolutely crazy

    Now let’s find out why this is happening and how to fix it

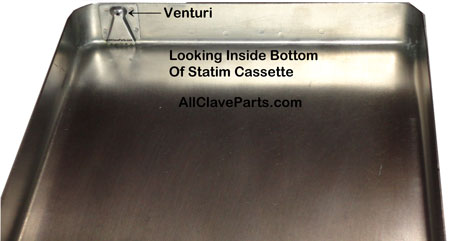
    Here is what we have found is happening in most cases: A piece of debris has gotten lodged inside the Venturi. What?

    We will address what the Venturi does in a later article, but for now, just know that it is a constrictor.

    The Venturi is located in the rear of the bottom half of the Statim Cassette as shown in the picture below

    Statim Cassette Venturi

    When debris gets lodged in the path of the Venturi, it can cause it to whistle (as well as result in other problems)

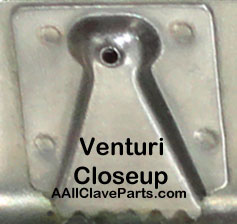
    Here is a closer look at the Venturi Plate

    Statim Cassette Venturi Closeup

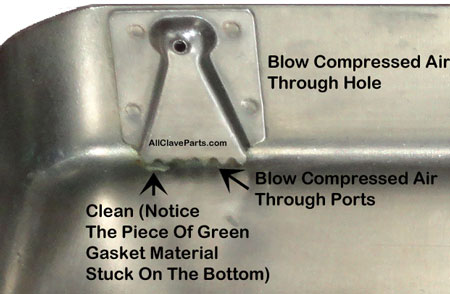
    Thankfully, the fix is an easy one. Simply blow compressed air into the Venturi hole and throughout the plate (including the ports at the bottom of the plate)

    Note: If you are a dentist, the syringe air in your operatory works well for this

    How to Clean The Statim Cassette Venturi

    Also notice the piece of green gasket stuck below the Venturi plate in the picture above. This is a real example and the piece of gasket was actually baked onto the surface

    Make sure to remove any debris and clean the area as well

    That’s it, you are done and problem is solved

    One more thing: While you have the cassette out and apart, it is a good time to give it a thorough cleaning. While we do not get any promotional consideration for recommending it, we use “Bar Keeper’s Friend” (Bon Ami works equally well) with a nylon scrub pad (made for cleaning Teflon).

    It will make your Statim Cassette Look like new again!

    Statim Error: Check Cassette 1

    $
    0
    0

    Statim 2000 Error Code: “CHECK CASSETTE #1″

    Note: "Check Cassette" Error Codes were used on the early model Statim Autoclaves, and when your error number is prefaced with "Check Cassette" it means you have an older model.

    The newer Statim Autoclaves use "Cycle Fault" Error Codes. While the numerical sequence means the same for some faults, there are deviations. So you need to make sure your Error is Check Cassette 1 before proceeding.

    If your error says, "Cycle Fault 1", then you are in the wrong place. We will be posting the "Cycle Fault" errors in the near future. In the meantime, you can contact us to find out what you need to know

    What Caused the Error Message "Check Cassette #1"

    This error is generated when the cassette temperature failed to reach 95°C in three minutes. This means the boiler is not heating up – Generally caused by no power to the boiler

    What do you do when this happens?

    In most cases, the Thermal Fuse has blown. The thermal fuse is located under the boiler. The fuse is contained inside the wire insulation, so it looks like a wire…and not a normal fuse.

    Statim 2000 Thermal Fuse

    Simply test it for continuity. To check the thermal fuse for continuity, disconnect the fuse assembly from the main PC board by removing the wire at the J1-3 pin location.

    Then measure the resistance of the thermal fuse assembly. An “open” reading signifies the fuse is bad and must be replaced. Be sure to reconnect the wire on the main PC board pin # J1-3

    If the Thermal Fuse is good, then you will need to proceed with the next steps you find by Clicking Here

    Note: Like any other fuse, you should always have a spare on hand. It is advisable that you order 2.

    Here’s the thing…..In the event you have not located the cause for the original fuse to blow in the first place, you could blow the new one as well. So, if you only order 1 and it blows, then you will have order another one and pay shipping again, as well as suffer an even longer downtime.

    IMPORTANT NOTE: To avoid damaging the new thermal fuse assembly try to identify the cause of the failure. There are a number of causes for thermal fuse failure. This could be caused by a weak water pump, steam leaks, faulty thermocouple, and or malfunctioning steam generator (also known as the boiler) (which may require cleaning or calibration).


    How To Replace The Pelton Crane Delta XL8 Door Insulation Pad

    $
    0
    0

    Replacing The Door Insulation Pad Could Not Be Easier With These Simple Instructions

    Note: While these instructions are specific for replacing the Delta XL8 Insulation Pad, they are exactly the same for the Delta 8, the Delta Q8, the Validator 8, and the Validator Plus 8. The Pelton Crane Part Number for these models are identical: OEM Part #1539514 (the earliest models had a part number of #0211812)

    You can click here to find the replacement Door Insulation Pad for your model autoclave

    The Delta XL8 Autoclave has an Insulation Pad tucked away inside it’s door assembly

    As its name implies, its function is to help insulate the door. It is a round disk made of a ceramic paper

    After years of use, one of two things generally happen:

    1. It gets thinner (or breaks down) and loses some of its insulating capabilities
    2. It sometimes manages to fold in on itself (wrinkles are literally folds

    While we do not currently fully understand how, when either of the 2 above conditions above exist, the door can begin to leak during a cycle. The leak is usually water and not steam. So, if you have replaced the door gasket and spacer, and it is still leaking around the door (dripping water from the bottom)…the insulation pad is the most likely cause

    Replacing the Insulation Pad is pretty simple and straight forward. The only tools you will need are a couple of wrenches and a screwdriver to complete the procedure

    To find the replacement Door Insulation Pad for the Delta XL8 Autoclave, Click Here

    Follow these simple instructions to replace the pad

    Delta XL8 Door Assembly

    How To Remove The Old Insulation Pad From The Delta XL8 Autoclave

    The first thing you will need to do is to remove the old pad. To do this:

    1. Remove the door handle by removing the 2 screws as shown in the picture above
    2. As you are facing the inside of the rear open door, pull on the top bar (notice the slots for the pins to move in and out – and the hinge pins on the right that allows it to swing open
    3. After swinging the assembly open, you will see a nut and washer sticking through the center of the plate as shown in the picture below
    4. Remove the nut & washer, slide the disk off and remove the old insulation pad

    How To Install The New Insulation Pad

    To install the new Insulation Pad, replace the old pad with the new by aligning the hole in the pad with the screw on the plate, and simply follow the above instructions in reverse order

    That’s it!

    Delta XL8 Insulation Pad Location

    Why Pouches remain wet after drying on the Statim 2000 Autoclave

    $
    0
    0

    First, it should be noted, handling the pouches when they are wet will compromise the sterility of the instruments being sterilized (the pouches are
    permeable and will allow bacteria from your hands to wick through to the instruments)

    You can view even more Statim 2000 Troubleshooting Guides on AllClaveParts.com by Clicking Here
    There are several possible causes for the pouches being wet after going through the drying cycle on the Statim 2000 Autoclaves

    1. The air filter(s) are dirty. The compressor air filter is located under the round metal plate on the back of the autoclave. There is a screw in the middle of the
      plate holding it in place. Using a phillips screwdriver, remove the screw, and then the plate. The filter is made of foam and is shaped like a donut.
      Remove the filter. If the filter is dirty, replace it.
    • Scican (Statim) recommends the filter be replaced every three months

    Newer units also have a Biological Filter. Like the Air Compressor Filter, if it gets dirty, it can impede the air flow and restrict drying. It too should be
    replaced on a regular basis

    • Ensure that cassette is clean and has been treated with Stat Dri™ or Sci-Dry™ (offered by AllClaveParts)
    • The Biological Filter should be replaced every 6 months or 500 cycles, whichever comes first

    Statim 2000 Air Compressor & Biological Filters Picture
  • The Drain Tube is Restricted. The Drain Tube must run directly to condenser bottle with no dips, loops or kinks.
  • Pouches are stacked. Pouches should be only 1 level deep. Do not stack them. The air must be able to circulate around the pouches freely
  • Wire Rack is lying flat. Make sure the wire mesh rack inside the cassette is inverted. This provides a space below the wraps for the air to flow and dry the bottom side of the pouches
  • Autoclave is not level. Check the Bubble Level on the Statim cabinet. Set the bubble to the 4:00 or 5:00 position by turning the front leveling legs
  • Airflow is restricted. Check for airflow through the autoclave. While the Statim 2000 is running in the drying cycle remove the exhaust tubing from the top of the waste bottle
    (be careful tubing may be hot). Place tubing into a cup of water, vigorous bubbles should appear in the cup of water. If bubbles do not appear, check
    airflow from compressor to waste bottle.
  • Air Compressor Is Not turning On. Make sure the compressor is running during the drying cycle. You should be able to hear it running and you can also feel it running by placing
    your hand on top of the cabinet (in line with the air compressor filters)
  • Statim 2000 Plumbing Diagram

    Statim 2000 Autoclave Does Not Power Up

    $
    0
    0

    It can be very frustrating when you turn on your Statim 2000 Autoclave & nothing happens

    But, like all other autoclave troubleshooting, it’s just a matter of knowing where to start to find & fix the problem

    We have two set of procedures here, and to find the one applicable to your autoclave, you will need to know which software revision your unit has. Discovering the software revision is fairly simple. Just Click Here and follow the instructions

    Once you know the software revision, just find it on this page and follow the directions

    No Power To Statim with Software Rev. 3.0 or 4.2

    Statim PCB Board 3.0
    1. Verify that there is no display and no green power light
    2. Check outlet to make sure there is power to the outlet (check circuit breaker)
    3. Verify power switch is turned ON
    4. With power switch OFF check all fuses for continuity. If fuse(s) are not continuous, then they have blown and need to be replaced
    5. Turn main power switch ON
    6. Using a voltmeter check for line voltage at bottom two terminals on the left side of the PCB, J1-1 and J1-2. If line voltage is present proceed to step 7. If not check for burnt wiring from power cord to the power switch to the PCB
    7. Check For line voltage on the left side of the two 15 amp fuses. Place one meter lead on the left side of the upper fuse (F1) and one meter lead on the left side of the lower fuse (F2). If line voltage is present proceed to step 8. If not check the PCB for a bad connection between terminal J1-1 and the lower 15 amp fuse (F2) or terminal J1-2 and the upper 15 amp fuse (F1)
    8. Check for line voltage on the right side of the two 15 amp fuses. Place one meter lead on the right side of the upper fuse (F1) and one meter lead on the right side of the lower fuse (F2). If line voltage is present the Printed Circuit Board (PCB) is bad. If line voltage is not present recheck the 15 amp fuses or check for a bad connection at the fuse holders

    You can find more Statim 2000 Autoclave Repair & Troubleshooting guides by Click Here

    No Power To Statim 2000 with Software Revision 2.4 – 2.92 & 6.4

    Statim 2000 PCB Board 2.9
    1. Verify that there is no display and no green power light
    2. Check outlet to make sure there is power
    3. Check that power cord is plugged into electrical outlet and back of Statim
    4. Verify power switch is turned ON
    5. With power switch OFF, check all fuses for continuity. If they are not continuous, then the fuse(s) have blown and will need to be replaced
    6. Turn power switch ON
    7. Using a voltmeter check for line voltage at bottom two terminals on the left side of the PCB, J1-1 and J1-2. If line voltage is present proceed to step 8. If not check for burnt wiring from power cord to the power switch to the PCB
    8. Check for line voltage on the left side of the two 15 amp fuses. Place one meter lead on the left side of the upper fuse (F2) and one meter lead on the left side on the lower fuse (F3). If line voltage is present proceed to step 9. If not check the PCB for a bad connection between Terminal J1-1 and the lower 15 amp fuse (F3) or terminal J1-2 and the upper 15 amp fuse (F2)
    9. Check for line voltage on the right side of the two 15 amp fuses. Place one meter lead on the right side of the upper fuse (F2) and one meter lead on the right side of the lower fuse (F3). If line voltage is present the Printed Circuit Board (PCB) is bad. If line voltage is not present recheck 15 amp fuses or check for bad connection at fuse holders

    The Case of the Powerless Statim 2000 Autoclave

    $
    0
    0

    In our continuing effort to bring you everything you need to troubleshoot & do your own autoclave repair, here is an unusual problem we encountered recently

    Despite walking our client through the normal troubleshooting process, he was still unable to get his Statim 2000 to power up.

    So, he took the lead and not only did he find the problem, he was able to fix it! And, he was kind enough to share his experience with us, which we are now sharing with you.

    The Statim 2000 is Getting Power, but It’s Still Dead….Now What?

    After tracing the power from the wall outlet following our “No Power Troubleshooting Guide” (Click Here to see the procedures), our client was able to determine power was flowing all the way to the PC Board

    Now, I have to admit, when there is problem with the PC Board on an older Statim 2000 (which appeared to be the case here), we usually encourage people to either buy the Digital Electronics course and try to repair the board themselves (you can view the course offering by clicking here), or to replace the autoclave

    But, the Dentist believed it had to be something simple, and he asked a patient of his (who is also a retired electrical engineer) to take a look a look at it.

    Where Does It End?

    The Electrician first retraced all of the steps we had given him, confirming that there was electricity present from the wall to the Terminal Block on the PC Board, where it simply stopped. There was not any power present anywhere on the board itself

    Knowing the power was making it to the board, but not flowing on from there, they knew it had to be the power connections to the board. They placed a jumper wire on the power connections to bridge the connection and tried a cycle. The power came back on and it completed the cycle successfully

    The Case of the Powerless Statim is Solved

    So, they removed the board from the Statim & inspected the back of the board

    Sure enough, they found a broken solder joint where the power lines connect to the board. So, the Dentist got his soldering gun and carefully put more solder in place. He then re-installed the board


    Click Here For A Larger Image

    After putting everything back together, he ran another test cycle. The power was restored, it completed the cycle, and now the Dentist’s Statim is once again sterilizing his instruments

    Had he not taken the initiative, the Dentist would have ended up replacing the autoclave. Even if he sent it off for repair, most repair facilities would have stopped at the board, and not taken the extra step of removing and examining it. They would have simply recommended replacing the autoclave.

    Lessons Learned From This True Story

    1. Don’t be afraid to ask for help (and that includes asking us!)
    2. Don’t give up easily. Use logic and your critical thinking skills (if this, then that) to think it through

    After all, if the Statim 2000 Autoclave is destined to become a boat anchor anyway, what can you hurt?

    OCR Autoclave Repair: The Case of the Mysterious Door Leak

    $
    0
    0

    Any time there is a leak around the door on the Pelton Crane OCR Autoclave, everyone automatically assumes it is due to a faulty door gasket

    And for the most part, they are usually right

    But what if replacing the door gasket doesn’t fix it?

    Here is how to find & fix the problem

    What To Do If Replacing The Door Gasket Doesn’t Fix the Pelton Crane OCR Steam Leak Around the Door

    First, Even if you just replaced it, let’s make sure you did not get a defective (or used) door gasket. Most door gaskets will look like new, even when they are old & well used. The fact of the matter is, they don’t really wear out

    The real problem is they will actually shrink a little bit. Not enough that you can notice the shrinkage, but enough to allow steam to get by. So just inspecting the door gasket won’t tell you whether it is good or bad, unless it has a tear in it

    Regardless, remove the gasket from the door and make sure the grove it fits in is clean, as well as the mating surface on the cabinet. It doesn’t take much, a little debris can cause it to leak

    Also, wipe down the door gasket before re-installing it to remove any debris that may have stuck to it

    If you need a new one, click here to make sure you get a new, High Quality OCR Door Gasket

    Now try a cycle, and make a note of where the steam is escaping from around the door. Then rotate the gasket & try another cycle

    If the steam follows the rotation, then the problem is with the door gasket. Replacing it with a new one should eliminate the problem

    But what if the steam leak does not follow the gasket when you rotate it…then what?

    Probable Cause

    There are several possible causes

    1. Open the chamber door 90°
    2. Lift up on the door
    3. If the door tilts in, or moves, then the hinge pins have worn and need to be replaced. This is the most common problem next to the door gasket. However, if the door is solid and does not move, then go to step 4. You can Click Here For Replacement Hinge Pins.
    4. Remove the cabinet. Towards the front of the chamber, about midway up, there is a U Shaped Bracket on each side that holds the chamber in place as shown in the picture below. Make sure the bolts have not loosened. Make sure the brackets have not slipped from their place. If needed, move brackets back into place and then re-tighten the bolts. Repeat for other side of chamber.

    These steps should resolve about 99% of the causes for steam to be leaking around the door on your Pelton Crane OCR autoclave. But, if it doesn’t solve your problem, just let us know

    Viewing all 272 articles
    Browse latest View live